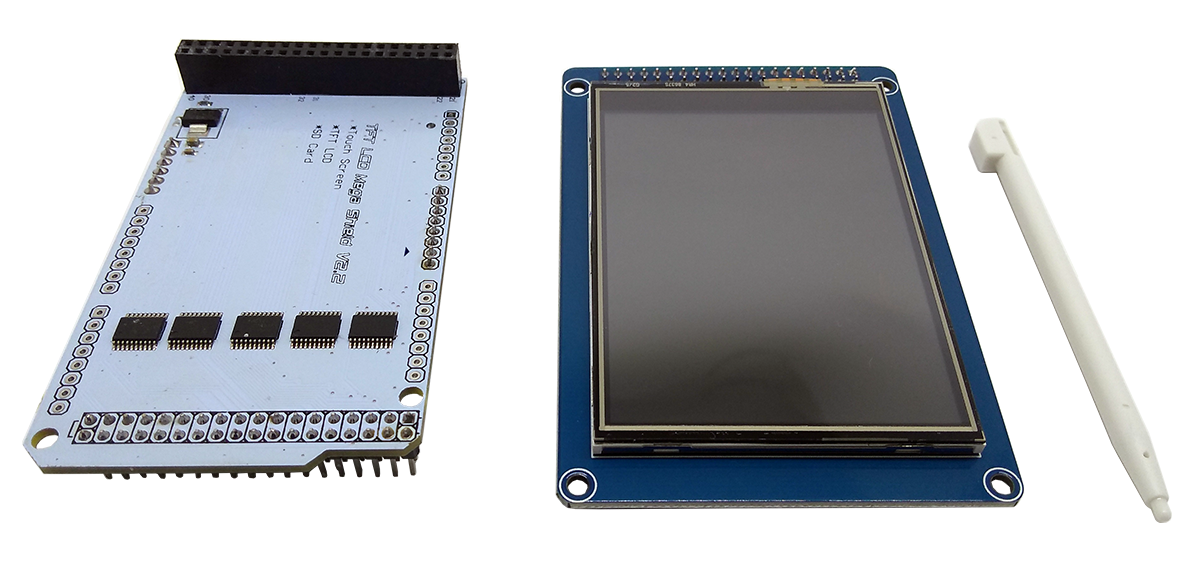
Display LCD TFT 3.2” Touch Screen contribui para ampliar a visualização das informações, facilitando a leitura de dados e aumentando a interação com o operador/usuário. É perfeito para a criação ou aprimoramento de projetos, com uma interface simples e com uma capacidade de exibir em tempo real informações por apenas um toque na tela.
TFT SHIELD de Acoplamento para Arduino Mega
O TFT Shield de Acoplamento é totalmente montado, não precisando de nenhuma fiação ou solda, bastando apenas encaixar os pinos ao Arduino Mega e posteriormente somente fixar o Display no Shield de Acoplamento e, então, está pronto para uso.
Especificações do Display LCD TFT 3.2” Touch Screen
-
- Display driver: ILI9341
- Chip de controle do painel de toque: XPT2046
- Regulador de tensão 3.3 v
- Um soquete de cartão SD
- Formato RGB565 de 16 bits
- Pode ser conduzido por 8051/AVR/PIC e outros controladores de baixa potência
- Resolução: 240×320 pontos
- Tela: 262K Cores
Especificações SHIELD de Acoplamento para Arduino Mega
-
- Compatível com Arduino MEGA
- Tensão de funcionamento: 3.3V
- Ótima solução para a conexão com o Módulo Display TFT
- Suporta módulo Display TFT de 2,4 ” ou 3,2″
- Suporta modo 8 bits ou modo 16 bits
Aplicação
Primeiramente, precisamos adquirir um Display LCD TFT 3.2” Touch Screen, um Shield de acoplamento e um Arduino Mega. Em seguida, é preciso fazer as junções do Shield de Acoplamento no Arduino e do Display no Shield.
Feito isso, precisaremos incluir as bibliotecas UTFT.h e URTouch.h.
Código 1
Partindo para o código, escolheremos, primeiramente, o exemplo mais simples: o URTouch_QuickDraw da biblioteca URTouch.h. Então, fazendo algumas modificações, finalmente, podemos carregar o código no Arduino.
#include <UTFT.h>
#include <URTouch.h>

// Initialize display
// ------------------
// Set the pins to the correct ones for your development board
// -----------------------------------------------------------
// Standard Arduino Uno/2009 Shield            : <display model>,19,18,17,16
// Standard Arduino Mega/Due shield            : <display model>,38,39,40,41
// CTE TFT LCD/SD Shield for Arduino Due       : <display model>,25,26,27,28
// Teensy 3.x TFT Test Board                   : <display model>,23,22, 3, 4
// ElecHouse TFT LCD/SD Shield for Arduino Due : <display model>,22,23,31,33
//
// Remember to change the model parameter to suit your display module!
UTFT    myGLCD(ILI9341_16, 38, 39, 40, 41); // Display driver ILI9341

// Initialize touchscreen
// ----------------------
// Set the pins to the correct ones for your development board
// -----------------------------------------------------------
// Standard Arduino Uno/2009 Shield            : 15,10,14, 9, 8
// Standard Arduino Mega/Due shield            :  6, 5, 4, 3, 2
// CTE TFT LCD/SD Shield for Arduino Due       :  6, 5, 4, 3, 2
// Teensy 3.x TFT Test Board                   : 26,31,27,28,29
// ElecHouse TFT LCD/SD Shield for Arduino Due : 25,26,27,29,30
//
URTouch  myTouch( 6, 5, 4, 3, 2);

void setup()
{
  myGLCD.InitLCD();
  myGLCD.clrScr();

  myTouch.InitTouch();
  myTouch.setPrecision(PREC_MEDIUM);
}

void loop()
{
  long x, y;

  while (myTouch.dataAvailable() == true)
  {
    myTouch.read();
    x = myTouch.getX();
    y = myTouch.getY();

    if ((x != -1) and (y != -1))
    {
      myGLCD.drawPixel (x, -y + 240); // Alteração para ajustar ao modelo
    }
  }
}
Muito importante é saber qual o modelo do seu display driver para fazer a mudança no código, pois, caso não seja feita, não funcionará.

Outra mudança para o correto funcionamento do display, foi nas coordenadas y, pois, neste display utilizado, quando passava a caneta touch no sentido vertical, o movimento da direção estava invertido e então foi necessário fazer um ajustamento.

Então, agora, é só pegar a caneta touch e fazer alguns rabiscos na tela e observar os movimentos.

Código 2
Partindo para o segundo código URTouch_ButtonTestn, percebemos que é um exemplo mais interessante onde aparece 10 dígitos para digitar e gravar na tela.
#include <UTFT.h>
#include <URTouch.h>

// Initialize display
// ------------------
// Set the pins to the correct ones for your development board
// -----------------------------------------------------------
// Standard Arduino Uno/2009 Shield            : <display model>,19,18,17,16
// Standard Arduino Mega/Due shield            : <display model>,38,39,40,41
// CTE TFT LCD/SD Shield for Arduino Due       : <display model>,25,26,27,28
// Teensy 3.x TFT Test Board                   : <display model>,23,22, 3, 4
// ElecHouse TFT LCD/SD Shield for Arduino Due : <display model>,22,23,31,33
//
// Remember to change the model parameter to suit your display module!
UTFT    myGLCD(ILI9341_16, 38, 39, 40, 41);

// Initialize touchscreen
// ----------------------
// Set the pins to the correct ones for your development board
// -----------------------------------------------------------
// Standard Arduino Uno/2009 Shield            : 15,10,14, 9, 8
// Standard Arduino Mega/Due shield            :  6, 5, 4, 3, 2
// CTE TFT LCD/SD Shield for Arduino Due       :  6, 5, 4, 3, 2
// Teensy 3.x TFT Test Board                   : 26,31,27,28,29
// ElecHouse TFT LCD/SD Shield for Arduino Due : 25,26,27,29,30
//
URTouch  myTouch( 6, 5, 4, 3, 2);

// Declare which fonts we will be using
extern uint8_t BigFont[];

int x, y;
char stCurrent[20] = "";
int stCurrentLen = 0;
char stLast[20] = "";

/*************************
**   Custom functions   **
*************************/

void drawButtons()
{
  // Draw the upper row of buttons
  for (x = 0; x < 5; x++)
  {
    myGLCD.setColor(0, 0, 255);
    myGLCD.fillRoundRect (10 + (x * 60), 10, 60 + (x * 60), 60);
    myGLCD.setColor(255, 255, 255);
    myGLCD.drawRoundRect (10 + (x * 60), 10, 60 + (x * 60), 60);
    myGLCD.printNumI(x + 1, 27 + (x * 60), 27);
  }
  // Draw the center row of buttons
  for (x = 0; x < 5; x++)
  {
    myGLCD.setColor(0, 0, 255);
    myGLCD.fillRoundRect (10 + (x * 60), 70, 60 + (x * 60), 120);
    myGLCD.setColor(255, 255, 255);
    myGLCD.drawRoundRect (10 + (x * 60), 70, 60 + (x * 60), 120);
    if (x < 4)
      myGLCD.printNumI(x + 6, 27 + (x * 60), 87);
  }
  myGLCD.print("0", 267, 87);
  // Draw the lower row of buttons
  myGLCD.setColor(0, 0, 255);
  myGLCD.fillRoundRect (10, 130, 150, 180);
  myGLCD.setColor(255, 255, 255);
  myGLCD.drawRoundRect (10, 130, 150, 180);
  myGLCD.print("Clear", 40, 147);
  myGLCD.setColor(0, 0, 255);
  myGLCD.fillRoundRect (160, 130, 300, 180);
  myGLCD.setColor(255, 255, 255);
  myGLCD.drawRoundRect (160, 130, 300, 180);
  myGLCD.print("Enter", 190, 147);
  myGLCD.setBackColor (0, 0, 0);
}

void updateStr(int val)
{
  if (stCurrentLen < 20)
  {
    stCurrent[stCurrentLen] = val;
    stCurrent[stCurrentLen + 1] = '\0';
    stCurrentLen++;
    myGLCD.setColor(0, 255, 0);
    myGLCD.print(stCurrent, LEFT, 224);
  }
  else
  {
    myGLCD.setColor(255, 0, 0);
    myGLCD.print("BUFFER FULL!", CENTER, 192);
    delay(500);
    myGLCD.print("            ", CENTER, 192);
    delay(500);
    myGLCD.print("BUFFER FULL!", CENTER, 192);
    delay(500);
    myGLCD.print("            ", CENTER, 192);
    myGLCD.setColor(0, 255, 0);
  }
}

// Draw a red frame while a button is touched
void waitForIt(int x1, int y1, int x2, int y2)
{
  myGLCD.setColor(255, 0, 0);
  myGLCD.drawRoundRect (x1, y1, x2, y2);
  while (myTouch.dataAvailable())
    myTouch.read();
  myGLCD.setColor(255, 255, 255);
  myGLCD.drawRoundRect (x1, y1, x2, y2);
}

/*************************
**  Required functions  **
*************************/

void setup()
{
  // Initial setup
  myGLCD.InitLCD();
  myGLCD.clrScr();

  myTouch.InitTouch();
  myTouch.setPrecision(PREC_MEDIUM);

  myGLCD.setFont(BigFont);
  myGLCD.setBackColor(0, 0, 255);
  drawButtons();
}

void loop()
{
  while (true)
  {
    if (myTouch.dataAvailable())
    {
      myTouch.read();
      x = myTouch.getX();
      y = myTouch.getY();

      if ((y >= 190) && (y <= 300)) // Upper row    ---------------------
      {
        if ((x >= 10) && (x <= 60)) // Button: 1
        {
          waitForIt(10, 10, 60, 60);
          updateStr('1');
        }
        if ((x >= 70) && (x <= 120)) // Button: 2
        {
          waitForIt(70, 10, 120, 60);
          updateStr('2');
        }
        if ((x >= 130) && (x <= 180)) // Button: 3
        {
          waitForIt(130, 10, 180, 60);
          updateStr('3');
        }
        if ((x >= 190) && (x <= 240)) // Button: 4
        {
          waitForIt(190, 10, 240, 60);
          updateStr('4');
        }
        if ((x >= 250) && (x <= 300)) // Button: 5
        {
          waitForIt(250, 10, 300, 60);
          updateStr('5');
        }
      }

      if ((y >= 120) && (y <= 180)) // Center row --------------------------
      {
        if ((x >= 10) && (x <= 60)) // Button: 6
        {
          waitForIt(10, 70, 60, 120);
          updateStr('6');
        }
        if ((x >= 70) && (x <= 120)) // Button: 7
        {
          waitForIt(70, 70, 120, 120);
          updateStr('7');
        }
        if ((x >= 130) && (x <= 180)) // Button: 8
        {
          waitForIt(130, 70, 180, 120);
          updateStr('8');
        }
        if ((x >= 190) && (x <= 240)) // Button: 9
        {
          waitForIt(190, 70, 240, 120);
          updateStr('9');
        }
        if ((x >= 250) && (x <= 300)) // Button: 0
        {
          waitForIt(250, 70, 300, 120);
          updateStr('0');
        }
      }

      if ((y >= 10) && (y <= 100)) // Upper row ----------------------------
      {
        if ((x >= 10) && (x <= 150)) // Button: Clear
        {
          waitForIt(10, 130, 150, 180);
          stCurrent[0] = '\0';
          stCurrentLen = 0;
          myGLCD.setColor(0, 0, 0);
          myGLCD.fillRect(0, 224, 319, 239);
        }
        if ((x >= 160) && (x <= 300)) // Button: Enter
        {
          waitForIt(160, 130, 300, 180);
          if (stCurrentLen > 0)
          {
            for (x = 0; x < stCurrentLen + 1; x++)
            {
              stLast[x] = stCurrent[x];
            }
            stCurrent[0] = '\0';
            stCurrentLen = 0;
            myGLCD.setColor(0, 0, 0);
            myGLCD.fillRect(0, 208, 319, 239);
            myGLCD.setColor(0, 255, 0);
            myGLCD.print(stLast, LEFT, 208);
          }
          else
          {
            myGLCD.setColor(255, 0, 0);
            myGLCD.print("BUFFER EMPTY", CENTER, 192);
            delay(500);
            myGLCD.print("            ", CENTER, 192);
            delay(500);
            myGLCD.print("BUFFER EMPTY", CENTER, 192);
            delay(500);
            myGLCD.print("            ", CENTER, 192);
            myGLCD.setColor(0, 255, 0);
          }
        }
      }
    }
  }
}
Com as devidas alterações no exemplo das coordenadas para se ajustar ao nosso display, conseguiremos trabalhar perfeitamente esse código.

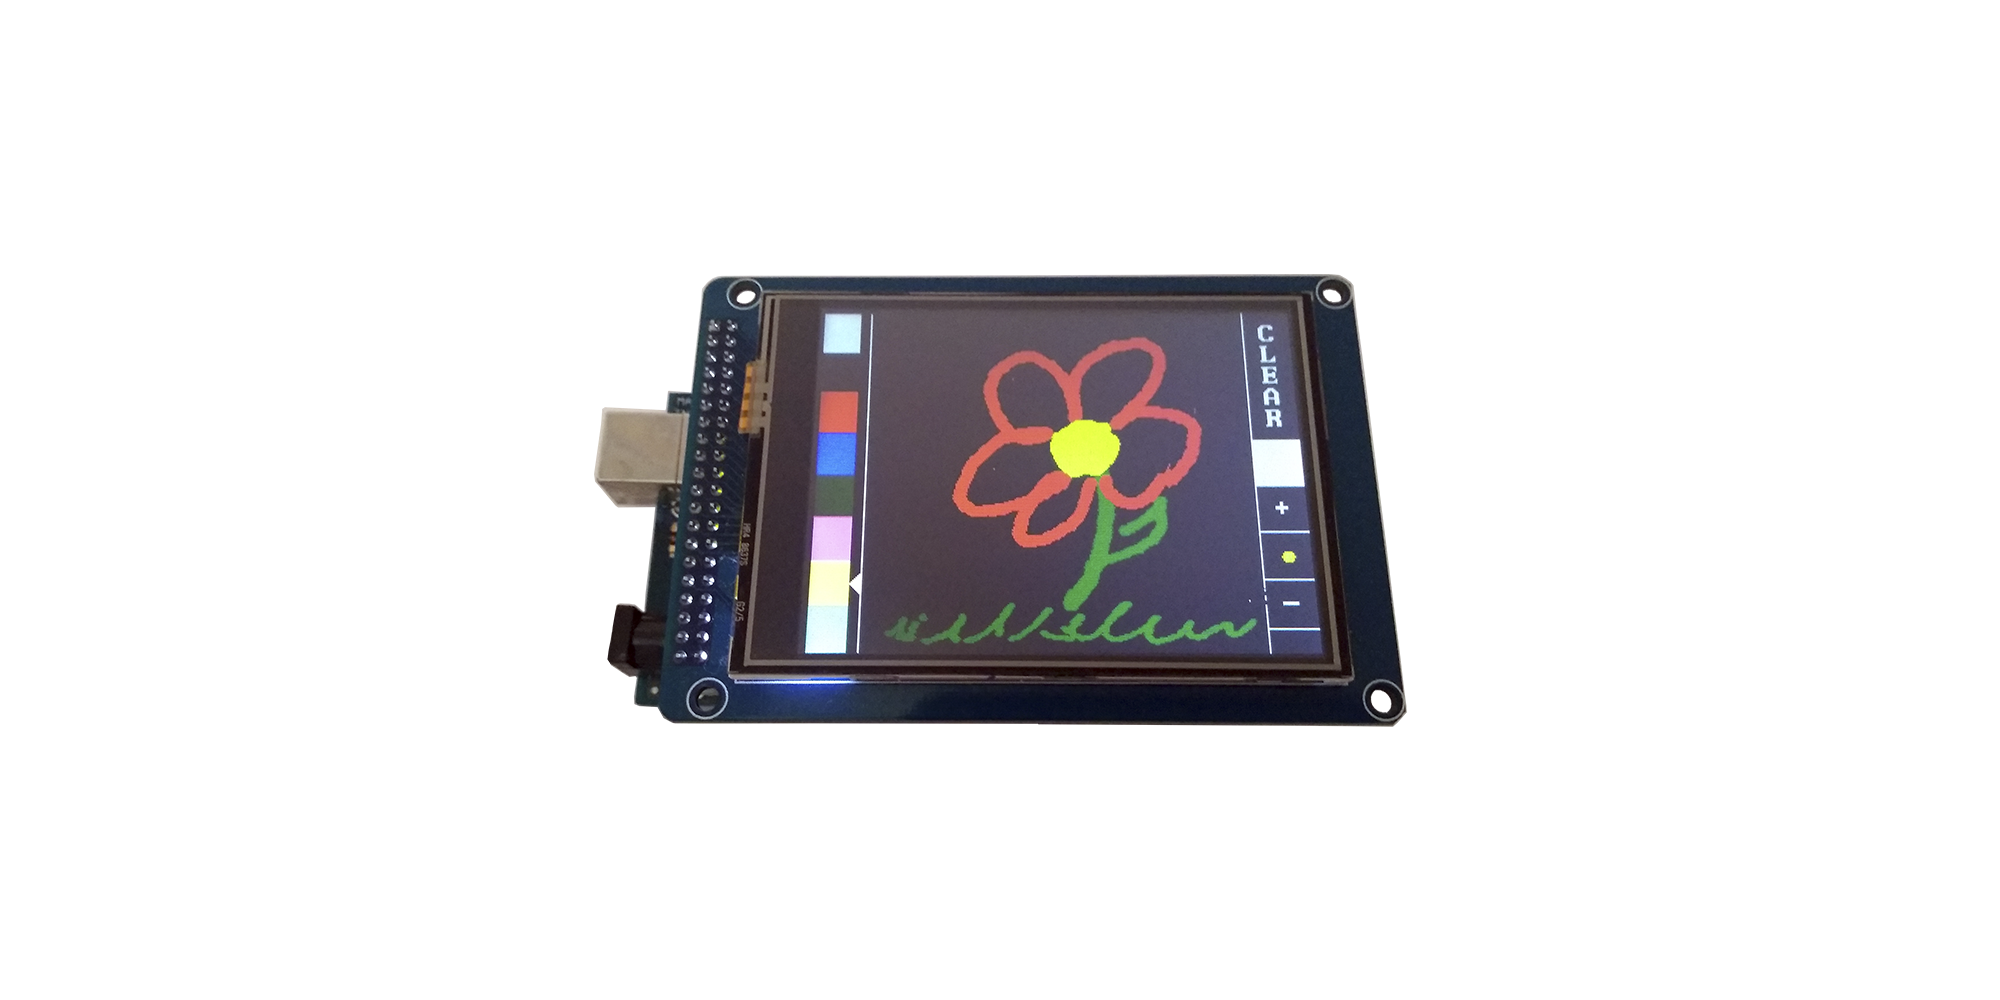
Código3
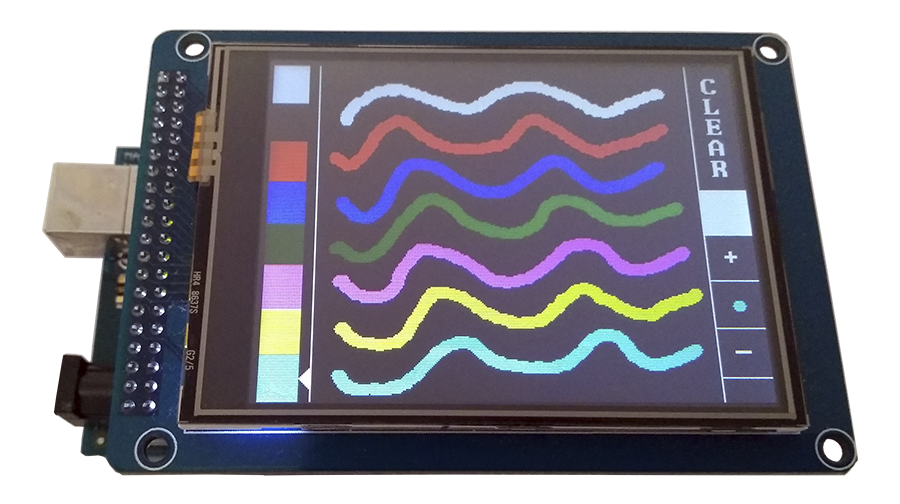
Finalmente, o último exemplo URTouch_QuickPain é um pouco mais interessante onde podemos fazer desenhos na tela com outras cores.
#include <UTFT.h>
#include <URTouch.h>

// Initialize display
// ------------------
// Set the pins to the correct ones for your development board
// -----------------------------------------------------------
// Standard Arduino Uno/2009 Shield            : <display model>,19,18,17,16
// Standard Arduino Mega/Due shield            : <display model>,38,39,40,41
// CTE TFT LCD/SD Shield for Arduino Due       : <display model>,25,26,27,28
// Teensy 3.x TFT Test Board                   : <display model>,23,22, 3, 4
// ElecHouse TFT LCD/SD Shield for Arduino Due : <display model>,22,23,31,33
//
// Remember to change the model parameter to suit your display module!

//UTFT    myGLCD(ITDB32S,38,39,40,41);

UTFT    myGLCD(ILI9341_16,38,39,40,41); // Modelo ILI9341

// Initialize touchscreen
// ----------------------
// Set the pins to the correct ones for your development board
// -----------------------------------------------------------
// Standard Arduino Uno/2009 Shield            : 15,10,14, 9, 8
// Standard Arduino Mega/Due shield            :  6, 5, 4, 3, 2
// CTE TFT LCD/SD Shield for Arduino Due       :  6, 5, 4, 3, 2
// Teensy 3.x TFT Test Board                   : 26,31,27,28,29
// ElecHouse TFT LCD/SD Shield for Arduino Due : 25,26,27,29,30
//
URTouch  myTouch( 6, 5, 4, 3, 2);

// Declare which fonts we will be using
extern uint8_t BigFont[];

int color = 0;
word colorlist[] = {VGA_WHITE, VGA_BLACK, VGA_RED, VGA_BLUE, VGA_GREEN, VGA_FUCHSIA, VGA_YELLOW, VGA_AQUA};
int  bsize = 4;

void drawColorMarkerAndBrushSize(int col)
{
  myGLCD.setColor(VGA_BLACK);
  myGLCD.fillRect(25, 0, 31, 239);
  myGLCD.fillRect(myGLCD.getDisplayXSize()-31, 161, myGLCD.getDisplayXSize()-1, 191);
  myGLCD.setColor(VGA_WHITE);
  myGLCD.drawPixel(25, (col*30)+15);
  for (int i=1; i<7; i++)
    myGLCD.drawLine(25+i, ((col*30)+15)-i, 25+i, ((col*30)+15)+i);

  if (color==1)
    myGLCD.setColor(VGA_WHITE);
  else
    myGLCD.setColor(colorlist[col]);
  if (bsize==1)
    myGLCD.drawPixel(myGLCD.getDisplayXSize()-15, 177);
  else
    myGLCD.fillCircle(myGLCD.getDisplayXSize()-15, 177, bsize);

  myGLCD.setColor(colorlist[col]);
}

void setup()
{
  myGLCD.InitLCD();
  myGLCD.clrScr();
  myGLCD.setFont(BigFont);

  myTouch.InitTouch();
  myTouch.setPrecision(PREC_HI);

  myGLCD.setColor(VGA_WHITE);
  myGLCD.drawLine(32,0,32,myGLCD.getDisplayYSize()-1);
  myGLCD.drawLine(myGLCD.getDisplayXSize()-32,0,myGLCD.getDisplayXSize()-32,myGLCD.getDisplayYSize()-1);
  myGLCD.print("C", myGLCD.getDisplayXSize()-24, 8);
  myGLCD.print("L", myGLCD.getDisplayXSize()-24, 24);
  myGLCD.print("E", myGLCD.getDisplayXSize()-24, 40);
  myGLCD.print("A", myGLCD.getDisplayXSize()-24, 56);
  myGLCD.print("R", myGLCD.getDisplayXSize()-24, 72);
  myGLCD.print("+", myGLCD.getDisplayXSize()-24, 136);
  myGLCD.print("-", myGLCD.getDisplayXSize()-24, 200);
  myGLCD.fillRect(myGLCD.getDisplayXSize()-32,96,myGLCD.getDisplayXSize()-1,128);
  myGLCD.drawLine(myGLCD.getDisplayXSize()-32,160,myGLCD.getDisplayXSize()-1,160);
  myGLCD.drawLine(myGLCD.getDisplayXSize()-32,192,myGLCD.getDisplayXSize()-1,192);
  myGLCD.drawLine(myGLCD.getDisplayXSize()-32,224,myGLCD.getDisplayXSize()-1,224);
  for (int i=0; i<8; i++)
  {
    myGLCD.setColor(colorlist[i]);
    myGLCD.fillRect(0, (i*30), 24, (((i+1)*30)-1));
  }
  drawColorMarkerAndBrushSize(color);
}

void loop()
{
  long x, y;

  while (myTouch.dataAvailable() == true)
  {
    myTouch.read();
    x = myTouch.getX();
    y = myTouch.getY();
    if ((x!=-1) and (y!=-1))
    {
      if (x>(31+bsize) and (x<myGLCD.getDisplayXSize()-(31+bsize)))
      {
        if (bsize==1)
        // myGLCD.drawPixel(x, y);
          myGLCD.drawPixel(x, -y+240); // Alterado para se adequar às coordenadas do Display
        else
          //myGLCD.fillCircle(x, y, bsize);
          myGLCD.fillCircle(x, -y + 240, bsize); //Alterado para se adequar às coordenadas do Display
      }
      else
      {
        if (x<(30+bsize))
        {
          if (y<240)
          {
            //color = (y / 30);
            color = -(y / 30) + 7; // Alterado para se adequar às coordenadas do Display

            drawColorMarkerAndBrushSize(color);
            while (myTouch.dataAvailable()) {};
            delay(50);
         }
        }
        else
        {
        //if (y<96)
          if ((y>150) and (y<240)) // Alterado para se adequar às coordenadas do Display
          {
            myGLCD.setColor(VGA_BLACK);
            myGLCD.fillRect(33, 0, myGLCD.getDisplayXSize()-33, myGLCD.getDisplayYSize()-1);
            myGLCD.setColor(colorlist[color]);
          }
         // if ((y>128) and (y<160))
          if ((y>80) and (y<120)) // Alterado para se adequar às coordenadas do Display
          {
            if (bsize<7)
            {
              bsize++;
              drawColorMarkerAndBrushSize(color);
              while (myTouch.dataAvailable()) {};
              delay(50);
            }
          }
         //if ((y>160) and (y<192))
          if ((y>40) and (y<60)) // Alterado para se adequar às coordenadas do Display
          {
              bsize=4;
              drawColorMarkerAndBrushSize(color);
              while (myTouch.dataAvailable()) {};
              delay(50);
          }
       // if ((y>192) and (y<224))
          if (y < 30) // Alterado para se adequar às coordenadas do Display
          {
            if (bsize>1)
            {
              bsize--;
              drawColorMarkerAndBrushSize(color);
              while (myTouch.dataAvailable()) {};
              delay(50);
            }
          }
        }
      }
    }
  }
}
Existe, então, uma variedade de aplicações com esse Display LCD TFT 3.2” Touch Screen onde se pode deixar o seu projeto com muito mais requinte.